Alan Kay is one of my favorite thinkers and has transformed my life. Here is an important talk from him about the current state of affairs that I think everyone should see.
This marks my ten years of programming. I went from zero knowledge to where I am today, and I am excited about how much more there is to learn. I started out doing data visualizations in Tableau using their scripting language. When Tableau became limiting, I was guided to d3.js and I began making visualizations with it, not knowing anything about HTML, CSS, or JavaScript. It was really hard to understand anything about what I was doing, but I was able to make visualizations after a lot of trial and error.
When I was thinking about what career path I wanted to go into I settled on web design. I did not know HTML or CSS but I knew that web design was a career and it might be something that fit my lifestyle, so I took a leap and bought HTML & CSS: Design and Build Websites. Working along this book solidified my fundamentals for how to create semantic websites and style them with CSS. I landed some design jobs for small websites doing pure HTML; no database, nothing. I began learning more about the web and was introduced to PHP. The more I read about PHP the more I realized there was a lot that went into making a real deal website. At my previous position doing visualizations WordPress was mentioned to me and sat in the back of my mind. I signed up for it, but honestly had no idea how to use it at first.
PHP and WordPress
I created a PHP driven website and was beginning to familiarize myself with WAMP to spin up MySQL, Apache and PHP on Windows. It was grueling but at the same time fascinating. PHP was my first foray into what a computer could do if you knew how to program it. After building in raw PHP, no Composer, I found that it just took forever to get something up and running, which is when I turned to WordPress. With the knowledge of how to set up a server in Apache I was able to set up WordPress in WAMP and quickly moved to VirtualBox and Vagrant using VVV to manage my WordPress sites locally.
I quickly began to realize that I would not be a web designer, but a web developer. I was much more into coding than creating beautiful designs. I parlayed my WordPress skills into freelance gigs for various clientele mostly in the eLearning space. I began to contribute to WordPress to further advance my skills. I started by contributing to the WordPress REST API as it was the most important project at the time. Contributing to WordPress is one of my goals for the coming years as I am aligning my work to overlap with WordPress again.
Learn JavaScript Deeply
I had really only dabbled with JavaScript creating visualizations in d3.js and doing small UI interactions for my sites. When Matt Mullenweg proclaimed “Learn JavaScript Deeply” I listened and did exactly that. Today, JavaScript/TypeScript is my most proficient language. There is more depth to traverse but I have gone pretty deep with it creating a CAD tool entirely in TypeScript. Not too long after this proclamation came the advent of Gutenberg, and once again I felt the need to contribute to deepen my skills. Now at the agency I work at all of our site builds on WordPress are Gutenberg based and we hope to leverage Gutenberg in Drupal as well where it makes sense to.
JavaScript/TypeScript React became a great addition to my toolbelt and it helped further my knowledge. Around this time I found out about Leetcode and started doing code puzzles on Hackerrank then later Leetcode. This helped me understand Big O notation and what it meant for systems that scale and how to optimize and problem solve your code to get answers. I also got interested in Project Euler as well around this time. It was around this time that I stumbled across David Nolen and ClojureScript. Prior to this I only programmed in PHP and JavaScript but the story of why Clojure was great was very compelling to me.
Exploring other languages
By the midpoint of my 10 year arc, I was learning at a much higher rate than when I first started out. As you become more familiar with concepts they generalize and compound across whatever your domain is.
“The first rule of compounding: Never interrupt it unnecessarily.”
– Charlie Munger
I could not agree with this more and learning has been the key to my success so far paying quite a lot in dividends, I finally feel like I am at the point now where I can start to make an impact in my industry. I have learned and programmed in Rust, Go, C, JS/TS, PHP, Clojure, Erlang, Elixir, Julia, Python, C#, and ARM Assembly. I would have never guessed that I would have learned to program with proficiency back from where I was 10 years ago, but here I am and I am still obsessed with it.
Understanding the Machine
I am thankful to have started when I did as the on ramp was a lot gentler than it would have been in previous decades, the web was full of instructional material on how to program and AI had not hit the scene yet. I am not sure if AI would have accelerated my learning or hinder it by confusing me with hallucinations. I heavily use AI today and all of the skills I have learned lead me to better prompts and agent use because I actually understand what I am trying to accomplish, back in the starter days I did not really know how to build or what I was building because I understood far far less about computers.
Today I can say that I have a solid understanding of how the various programs get turned into Assembly code to become the actual executable machine code, which in turn works with the operating system to do all of the magical things a computer can do. I understand the basics of memory, disk, protocols, logic gates and how they are combined together to perform the blazingly fast calculations that we somewhat take for granted. I have a rudimentary understanding of the all layers in the OSI model. I also can operate as a full stack engineer from administrating Linux to configuring/creating a web server, to the backend application code all the way to very interactive front end experiences. I have worked with a number of databases and other services and learned how to architect systems. I have trained various special purpose AI models.
Even though I have learned quite a bit about the world of computers, there is still an even greater amount out there to learn. The next decade is going to be where I really hit my stride as I finally feel like I have the fundamentals down to actually start building useful projects that I hope will bring joy and value to those who use them.
What’s Next
For the new year I now have my 10 year plan. I am going to be focusing on a few areas, using WordPress in novel ways, digging deep into AI agents, starting to blog, and continuing my learning and advancing my skills. I plan to write a 20 year recap and we will see if any of my goals were met. Hopefully this post can serve as a lesson to show that compounding learning leads to success in life.
I am not super into opera, however this one from Wagner always captivates me and this recording on YouTube I have randomly stumbled across is the best recording of it I have found. It is on YouTube so the quality is not great, but I am hoping I can find the EMI release and get a high quality copy.
I was inspired to blog from @photomatt’s birthday blog post. WordPress has reached a huge market share of the web. If you want to build a website, WordPress is a great option, if not the best option. We have also seen the web at large become dominated by a few platforms namely Meta’s Facebook and Instagram, Twitter now X, and the new comer TikTok. There is a rising interest in decentralizing social media as many feel the web has been lost to these major gated platforms. These platforms reaching massive scale has brought up many thought provoking questions and has impacted society tremendously. I was a kid when Facebook first came about and at the start it seemed like a nice way of connecting with people I knew. Unbeknownst to me at the time these platforms were harvesting our personal information and using it for various purposes like targeted advertising. Privacy and control over our personal data were compromised. What platform out in the world is open, independent, at scale and free? WordPress! WordPress can become the bedrock for an open social web liberating us from the control of the major platforms of today.
Moving forward with WordPress as a deeper connective tissue of the web
Inspired by Gary Pendergast’s talk on Connected WordPress I think now is the time to see this venture move forward. I will be dedicating my free time to working on making this a reality and would love help from fellow people who are interested in moving WordPress as a platform forward. We see efforts from Jetpack for reblogging and following and liking, but it does not really seem to have gained a lot of traction and I think misses the needs of people today as a social network. There is also BuddyPress which has many of the features of a social network, but is essentially centralized to your site and does not inter operate out of the box with other sites running Buddy Press, so not really a social network for web scale.
We see platforms like Slack being used to host communities, like Post Status, but this is yet another centralized closed service. Imagine if we could turn WordPress into a hub for communication, publication, and data ownership. Instead of Post Status using Slack it would natively host the same functionalities using WordPress. Now you might be thinking I am suggesting we somehow use native WordPress APIs and build this the WordPress way. No. I am proposing that a new decentralized/federated network is built on top of the massive scale that WP has reached.
The decentralized social network
There are a number of projects in the decentralized and federated social network space. It is a hot topic among developer circles but has not really caught on with general population. I think it will be very hard for mass adoption of these platforms as the onboarding and UX is not better than any of the major players. We are simply in a different landscape and I am not sure if the promise of decentralization is enough to attract people to these platforms. This is where WordPress could be a great platform to piggy back off of. WordPress is already federated and decentralized as this is how the open web works.
There are projects like Mastodon, Nostr, Gun.js, Matrix, SSB, and the AT Protocol, to name a few. I am sure there are many more that I am missing, but these are definitely players in the decentralized social network space. Most of these are protocols, and what I am thinking is we could get WordPress to speak one of these protocols. Then we would develop a client that operates on these protocols. The client could be run via Web Assembly to bootstrap it in a browser session or run on a native application. Spinning up a pub/relay would be as simple on WordPress as installing a plugin and configuring a few settings. If done well this would mean that the network could scale up very rapidly and go from unconnected nodes to a more rich mesh.
Which Protocol?
I think out of all of them Secure Scalable Scuttlebutt would be the ideal. It is a protocol that supports End-to-End Encryption a flexible schema for supporting applications, and is truly peer to peer and offline. The p2p and offline capabilities I think would be great in developing countries where internet is not always there but devices like cell phones are relatively common. With SSB over Wi-Fi you could connect directly with others on the network. WordPress again is the platform to build the network on top of as a bootstrapping point.
Task at hand
With PHP 8.1 Fibers were introduced as a low level way of starting to support asynchronous code in PHP. By default they will run synchronously but with a scheduler PHP can be made to operate asynchronously. So if someone has PHP 8.1 and WordPress, the goal would be to install the plugin and configure some settings and you are up and running. The first step would be to replicate ssb-server in PHP and then have a WordPress plugin that would be a thin wrapper around running that process. Then each WordPress in the world could quickly be turned into what is known as a pub in the SSB ecosystem. If you are running a community like Post Status, you could then send out invite links to users and/or make a public open invite to your community.
The second hurdle is to develop a truly first class client app to read and interact with the SSB network. This is where the magic happens. Imagine a new app that anyone can load up into their browser or run natively that will connect them to this new network. This will put the power for people to own their own data, have privacy over their data, and interact with people the way they choose. A four freedoms might include:
Freedom to Create and Manage Your Data and Feed
Freedom to Create and Moderate a Community for any Purpose
Freedom to Extend and Redistribute
Freedom to Communicate Privately
If the project is successful, a future would support any open source client, which could be paid or free. It would also support a plugin ecosystem like WordPress where different applications could be run over the network, for instance in SSB people have implemented Git, and chess as applications that can be run on the SSB protocol. The vision is to create a global network that would be vivacious and put all of the power into the consumer’s hands rather than have the power be held by giant tech corporations.
Leveraging WordPress
WordPress also serves as a great public way to distribute content on the internet. There are potential synergies by choosing WordPress as a piggy backing jump off point. WordPress could be leveraged to have a public facing site that could also publish to the SSB network certain content. This also means that via the WordPress REST API, there could be integrations where certain posts you make to SSB would also could end up on your public WordPress site, creating a loop of possibilities between the public web and a private network running on SSB.
WordPress also has Gutenberg a great editor that could be used to post rich content to SSB or be directly embedded into clients.
Democratizing Publishing
If we really want to democratize publishing and commerce, I think WordPress needs to become a platform for how everyday people are using the web. A protocol like SSB would open up future possibilities and a client could be your homepage for the web; your portal to a new kind of web free of control of any one company more in line with the vision of the open web. I will be posting my progress on this blog and if you are interested in this project feel free to reach out to me in comments or on WordPress slack; username chopinbach.
In my last post about Docker, we saw the basics of setting up images and running containers. Now we are going to build on this with another tool from Docker known as Docker Compose. We will use Docker Compose to set up a WordPress project. If you want to check out the code you can go to the GitHub Repository and play around yourself. WordPress is one of the main technologies I use on a daily basis for work and I thought it would be a good way to dig deeper into Docker.
Docker Compose
Docker Compose is a tool for Docker that let’s you automatically orchestrate containers. In our first foray into docker we manually started and ran each container from the command line. This works great in a small setup or for testing something out, but as soon as you have many containers that all talk to each other and you want a quick way to setup and tear down your project Docker Compose is the way to go. Docker Compose makes use of a docker-compose.yml file to organize the project. Here is our WP setup:
To spin up the WordPress set up you can run docker in detached mode. You can then navigate to localhost, or project.test (if you added it to your hosts file). You will see a fully operational WordPress setup.
docker-compose up -d
At the very top of the docker-compose.yml we see a version declaration. I am only familiar with Docker Compose 3, but there are more details on the differences on Docker’s website. The next area we see our declaration of services. Each of these services is essentially going to be a Docker container. Within each service we see various properties assigned to each container.
Image
Each container has an image specified here we have 3, mariadb:10.2, wordpress:5.6.1-php7.4-apache, and jwilder/nginx-proxy:alpine. These images all get pulled in from DockerHub, the official repository of Docker images. We have a db container running MariaDB, a wordpress container running WordPress & Apache, and lastly an Nginx server setup as a reverse proxy.
Environment
In our WordPress and DB containers we see an environment property where we are setting up our database. In a production environment you would not want to use these values and instead use real passwords and usernames that are secure. For a local setup, this works just fine.
Networks
We also see a property for each of our containers called networks. These are used by Docker to allow containers to interface with each other. In this example we have two simple networks, front and back. In our docker-compose.yml towards the bottom you will see this code:
networks:
  front:                     {}
  back:                      {}
This sets up the two Docker networks that our containers will communicate on. You can see that the db container only is on the back network and not the front. This is because we want the database to be on a network with other backend services. The wordpress container is on both the front and back network so that it can talk to the database, as well as talk to the Nginx reverse proxy. Lastly we see the Nginx proxy runs on the front with an alias set to whatever our domain for the project will be, making it so that this network is accessible by that domain name. By default this is set to project.test, as long as your hosts file points to localhost, you will be able to use that domain to access WordPress. Pretty neat.
Depends On
We have the wordpress container setup to depend on the db container. This means that the WordPress setup will not fully run until we have set up and have a running db container. This makes sense as WordPress cannot work without the SQL db backing it. depends_on allows us to have complex orchestration of containers and as more services get added there may be more dependencies that are needed.
Restart
If a container crashes, what should happen. This is the goal of the restart property which tells Docker what to do when a given container crashes. In this case all three containers are set to always restart.
Volumes
The volumes property is one of the most important. We will look at two different types of mounts. First we bind our local file system to the wordpress container filesystem for the themes, plugins, and mu-plugins directories:
The first part of volume binding is where we want to locally bind the folder, here it is the current directory themes folder. The next part of the binding is the folder on the actual container’s filesystem. In this case WordPress is installed at /var/www/html, making the themes folder available at /var/www/html/wp-content/themes. The last part of the binding is what type of settings are set for this binding. In this case each of the volumes for the wordpress container are set to Read Write. Allowing us to read and write to the files on our host machine’s filesystem.
Another type of volume we see is just a regular volume mount. Volumes are what Docker uses to persist data. In this case we are using a volume for our database, so that when we stop our containers and restart them the WordPress database will be what it was. Volumes unlike bind mounts are easier to share between containers and are great when you do not need to locally edit the files but still need persistence. Let’s look at two parts of our docker-compose.yml to see how to specify a volume.
The first property is a property on the db container. It is a volume named db_data being bound to the /var/lib/mysql folder on the db container’s filesystem. This is where MariaDB stores the database so we are essentially creating a volume to store all of our db data for the project.
The second volumes property is at the top level of the file and is simply declaring that there is a volume and its name is db_data the {} signifies we are just using the default properties for the volume.
Wrapping Up
I really like how quickly you can set up projects with Docker and how each part of the project can be quickly spun up and down without ever having to install anything on the host machine. If you want to run some PHP code you could spin up a Docker container with an image of PHP installed allowing you to run the code. Then when you are done simply stop and remove the container and nothing was installed directly to the host machine. With Docker Compose you can set up complex projects with different services set inside of containers that can all communicate with one another. Managing this locally can be cumbersome. Managing this with Docker Compose is a breeze. Next I am going to be digging deeper into Docker, and how to use it for actual production deployments instead of just as a local development tool.
Docker is a tool I have been looking to incorporate into my development process for sometime. I have used it many times glossing over the basics and hacking my way through it, but I have not dug in to the finer details of how to operate docker until now. This guide assumes you already have Docker installed.
What is Docker?
Docker is an open-source project for automating the deployment of applications as portable, self-sufficient containers that can run on the cloud, on-premises, or locally. Docker is also a company that promotes and evolves this technology.
Docker allows you to run code inside a container that communicates directly with the host operating system through the Docker engine. Containers are like a computer with an image that is ready to run. The image is like a ready to go hard drive for a container. One of the biggest appeals of Docker is that it allows you to create and run consistent environments, meaning you will not run into situations where code works on someone’s machine but not yours.
Getting started with the basics
Docker is a big topic. We will be exploring it piece by piece and hopefully by the end a clearer understanding of what Docker is, and how to use it will emerge.
Dockerfile
Dockerfile is used to build a Docker image. It is a basic file that contains sequential instructions on how to build an image. The name must be capitalized for it to work. Let’s create a project directory with a Dockerfile in it with the following code:
FROM ubuntu

MAINTAINER edwin

RUN apt-get update

CMD ["echo", "Welcome to Docker"]
Now let’s breakdown each line.
FROM
Generally you use an official image on which you build a new Docker image. In this case ubuntu is our base image, which is called the parent image. You can find images hosted here on Docker Hub. If we want to create a base image, we use ‘FROM scratch’ in the Dockerfile. Any other instructions mentioned in the Dockerfile are going to modify the Docker image.
MAINTAINER
Who the maintainer of the image is.
ENV
ENV is a way to create key value pairs. There are two syntaxes one being a one liner.
ENV APP nginx
ENV PORT 80
The above is equivalent to the following:
ENV APP=nginx PORT=80
Then those values can be used in the rest of the Dockerfile.
RUN
RUN apt-get update
This line runs code on the shell and allows us to modify the docker image. Multiline instructions can be built using the \ character.
The CMD directive defines what will be executed when a container is created using the Docker image. We should define only one CMD in a Dockerfile, however if we define multiple CMD instructions in a Dockerfile, only last CMD will get executed. If we specify any command while running the container, the specified command will take precedence and CMD instruction will not get executed. In this case it is a simple echo using the following message provided in the args.
Building the image
Now that we have gone over the basics of our example Dockerfile, let’s build the Docker image using above sample Dockerfile using below command:
docker build -t my_image .
This will build the image named my_image at our current working directory . where the Dockerfile should reside. You will see a whole bunch of output in your terminal, following the pulling of the base image, you will see the RUN command run and finally some more output around building the image. The -t flag is what allows us to tag this image with a name my_image.
Running the image on a container
Now we will run the image on a container. Remember the container is like a computer, and the image is like a special hard drive ready to go. We can run a container with the following command.
docker run --name mycontainer my_image
We should see the output Welcome to Docker on our terminal. Meaning the container started and ran our CMD. This is kind of like a Hello World example of Docker. We will explore more together in future posts!
Wrapping up
Docker uses containers to run images of predefined files, libraries, and code. Images can be built using a Dockerfile which is essentially a list of instructions for how to modify the image. Images can be built on top of parent images allowing ease of extension. Containers are like a computer that runs within the Docker engine to communicate with our host operating system.
Hey everyone! I am starting a series of Learning Elixir videos, where we learn the language together. Elixir is a really cool programming language that is known for its high scalability and fault tolerance. It is built on top of the Erlang Virtual Machine, which is what provides all of the magical features. Come learn with me!
For me personally, one of the main improvements in Gutenberg, compared to the classic WordPress editor, is the speed at which you can create content. A lot of this is due to the keyboard efficiency. There are a lot of hidden keyboard tools that we will look at, and some tips on how to quickly get content going in Gutenberg. I am on a Windows PC, so the quick keys mentioned will be different for MacOSX users. My daughter tried out the mobile experience as well for her website and thought it was relatively easy to use as well. I am very excited about getting more youth involved in using WordPress, which will be covered in future posts.
Back to the topic at hand.
Keyboard efficiency
Microsoft Word was in many ways the killer app of early PC days. It was most likely the culprit leading to the end of the typewriter. The typewriter in many ways has never died, as many are still stuck using the QWERTY keyboard layout, designed around the mechanical functionality of the typewriter, not the ease of human typing. Alternatives of keyboard layout have received minimal adoption. The speed at which we type can have a great impact. Time is the most valuable resource. Although most of us may be tied to a slower keyboard layout, we are definitely tied to a slower method of expressing thought. Gutenberg is a step in the right direction towards a more responsive interface for quickly getting our thoughts onto a canvas.
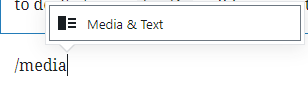
When I first started using Gutenberg I used all of the visual graphical elements to insert content. Now I have dug a bit deeper into the keyboard shortcuts, and do almost all of my posts entirely via the keyboard. It is an incredibly fluid experience, that will only improve from here. One of the biggest speed increases is using the slash commands (/). When a new block line is inserted you can access a list of blocks to insert by pressing /, similar to Slack.
Type slash on a new block line to open the command palette.
Once you type in the slash you will see a list of the most recently used blocks tailored to your needs. The pop up window will not be a complete list of every command available, and you will need to find those out for yourself, generally the name of a block is also the name of a command to insert a block. As you type after the slash command you will get an autocomplete functionality of the potential block command you are trying to do. So typing /media will bring me to creating the media and text below.
Typing a command will start to trigger an autocomplete. Very nifty.
When dealing with images and other layout elements I noticed it was sometimes tricky to create a new block, and relying on hitting the “Enter”/”Return” key was not always feasible. Luckily there is a keyboard shortcut to add a block either above or below the currently focused block. I typically add one after by using “Ctrl + Alt + Y”. To add a block before you can do “Ctrl + Alt + T”. Knowing these two commands coupled with the slash command has greatly increased the speed at which I can get my thoughts out. No more, cut/copy paste. Very fluid.
Another cool thing is duplication, by using “Ctrl + Shift + D”.
Another cool thing is duplication, by using “Ctrl + Shift + D”.
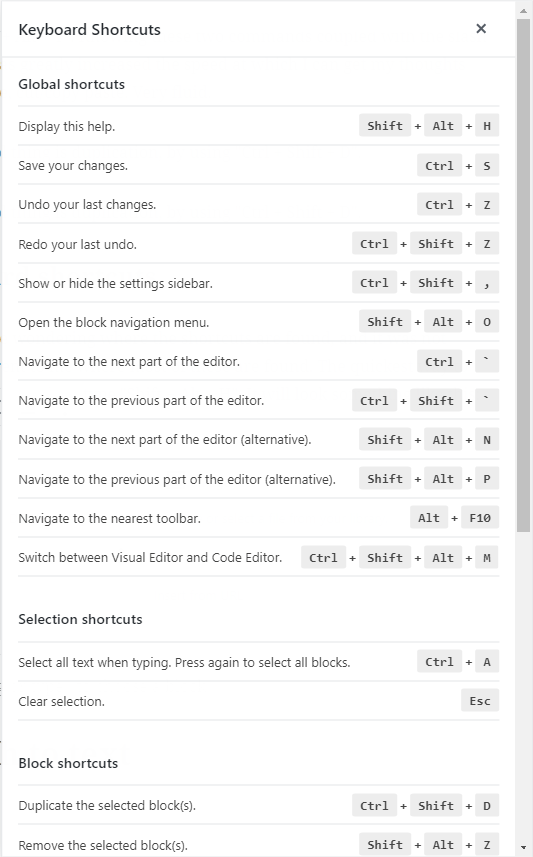
Keyboard shortcuts
You might be wondering where the shortcuts are found, and it was not super apparent to me where most of these are found. The quickest way to view all shortcuts is to type “Shift + Alt + H”. It will look something like this:
How did we get here in the first place though? In the top toolbar there is a “Show more tools & options” menu, represented by three dots. Under the Tools section there is the Keyboard Shortcuts menu, with the keyboard shortcut displayed next to it.
From here we get an extensive overview of the keyboard shortcuts for the editor. These really open up a lot of keyboard efficiency, and will greatly reduce the amount of time we spend creating content. I am not aware if there was anything similar in the classic WordPress editor experience.
Speech to text
I can also see some cool improvements in the future surrounding a speech to text interface for Gutenberg. It would be cool to be able to say a command like, “Gutenberg, insert an image block”, which would trigger an image block to be inserted below the current block selection. Due to our new access to the underlying data model of content, new interfaces for creating content beyond keyboard and mouse will become more feasible. It’s all about the blocks.
Wrapping Up
One of the many gifts that Gutenberg is bring to the web is a new more efficient medium of representing our thoughts and ideas. I think the level of creativity we are going to see over the next years will profoundly shape the future of the web. As always stay tuned for the rest of the series and drop some comments for ideas of your own.
With the block concept coming into WordPress, we will see new opportunities to share content. Services like Gutenberg Cloud will most likely pop up, and of course the WordPress.org plugin repository will also be available. One thing about something like Gutenberg Cloud is that you could potentially just grab blocks directly from within the editor. Pretty neat.
Due to Drupal also adopting the Gutenberg editor, any CMS that implements blocks the WordPress way, will be able to leverage the content from both ecosystems. This is very exciting and interesting.
Block sharing
For the most part, I am excited about this new idea. Unfortunately, there are people with malicious intention, and I definitely fear that with an explosion of small reusable pieces, we will see an increase of security vulnerabilities around the sharing of blocks. More on that later.
The positives are very exciting. There is the potential to limit how frequently you will go to the plugins tab. It’s definitely also possible that themes themselves will go away as well. I think a lot of this will be due to block sharing. Let’s say I build a block that allows you to apply a snapchatesque filter to your images. Since this would most likely be implemented in JavaScript (not necessarily the filter itself), it will be easy to share to all of the different platforms that support the block model present in Gutenberg. That would be a specific block and if you wanted to build a lot of weird goofy dog face pictures on your site, it would be perfect.
There will be many niche blocks, but there will also be general purpose blocks. Much like the internal parts of WordPress itself, the nav menus, widgets, shortcodes, etc. are all reasons why we use WordPress. They allow us to create content quickly and with relatively minimal headache. Blocks will supplant the need for a lot of these core APIs. There has been worry over the reduced role of meta boxes, but most likely it will all succumb to a block based implementation, which will probably be better anyways.
Currently, which we haven’t touched on too much in Gutenberg is the concept of reusable blocks. This is where I am the most excited about block sharing.
Reusable blocks
Right below is the first reusable block I am using on my site.
There is a weird bug, currently where I get an extra list item. Oh well not too big of a deal. The main exciting part is that I can use this across all of my posts now. Click on any of the links to see the same list being used across all. We get to share content within our own WordPress install. Pretty cool. But with things like the REST API available, we can potentially even provide content that can be widely distributed as a “reusable block”. I think there is a lot of room for innovation around this. Essentially since the reusable block is also essentially just a custom post type.
Although there is a lot of potential for creativity and sharing, I am somewhat concerned about the potential negatives.
The downsides
There are a two main downsides that are apparent to me: security, and code sprawl.
Security
As mentioned above, security, and education around security is going to be critical. If we make it too easy to grab whatever block from wherever, we are most likely in big trouble. This isn’t necessarily anything new, as you could make the argument that the WordPress.org plugin repository can be a major attack vector as well. This is definitely a reasonably fair assessment. The only difference with blocks, is that they will most likely be more prolific than plugins.
Blocks in their nature are most likely going to be smaller than an entire plugin. Purely due to the reduced amount of code needing to be written for a block, I can see a lot more blocks being created. Blocks are also mainly written in JavaScript, which we have established as the most widely used language. A lot of people are going to be creating a lot of block. In this massive mess of blocks, it will definitely be easy for bad actors to sneak in. If it becomes very easy to just grab a block from some platform, how will users be alerted around the potential dangers ahead? We need to start coming up with good solutions now.
Code Sprawl
We are probably in an era of immense code sprawl already. It might get worse. We will most likely see a lot of blocks that are pretty much the same block. Does this benefit the users? Will we be able to encourage new coders if there are clear winners already established for certain blocks? I think the ability to share blocks will potentially cut down on the creation of the same blocks, but I can definitely see the flip side where it increases. Maybe this isn’t a bad thing at all either. I tend to think that it is, but maybe it really does not matter all that much.
With the rise of distributed computing platforms, I think it will matter, as we will want a way to condense the amount of information we are sharing amongst each other to only what is necessary. The efficiency gains in distributed computing won’t mean very much if everyone has a slightly different file that does 99.9% the same thing. We will need some sort of block unifier, that can take the contributions of many and turn it into one singular block.
Wrapping Up
Gutenberg really opens up a lot of unique opportunities that were not previously possible. I am excited for the future and to see what comes. We will definitely need to be aware of the potential pitfalls ahead and start implementing some safeguards or strategies against them.
We are going to look at the editor UI in greater detail now. From a technical perspective the user interface is written in JavaScript leveraging the React library. There has been great effort to make the editor experience extensible like the rest of WordPress, which we will look at more in the future. The tech choices for Gutenberg are also almost as important as the project itself.
Significance of JavaScript
JavaScript is the leading client side language of the web. JavaScript is also most likely the most widely used language as well. Popularity doesn’t necessarily have a positive connotation, but it does mean that there is a wide group of people fluent in JavaScript.
This familiarity enables a lot of things. It enables new developers to more easily and quickly get involved with WordPress, as the client side shifts more and more to JavaScript functionality. In the goal of democratizing publishing, it might make sense to make one of the widely used programming languages a flagship aspect of the platform. JavaScript usage is not anything new to WordPress, but Gutenberg definitely takes it to a new level.
The widespread use of JavaScript also is largely due to JavaScript being a key language of the web. JavaScript’s unique position over time has made it a language available across many platforms. It has become a very large compilation target as well, allowing cross platform codebases to slowly become a concrete thing. Tools like Electron allow for targeting Windows, MacOS, and Linux. Tools like React Native allow JavaScript to become this interop layer for targeting iOS and Android. The shared thread between these is you guess it; JavaScript! Since the web is a cross platform thing, we will probably see more and more web technologies creeping into the native space, or at least that is the current trend.
The direction WordPress is taking technically, will hopefully enable it to reach an even wider audience. This does not mean PHP is going anywhere. PHP is by some estimations still the most widely used server side language. Even if or when PHP is no longer a bedrock of web applications, it is unlikely the entirety of WordPress core will be replaced with another language. Most likely something else would have replaced WordPress. The block concept in a lot of ways though does detach WordPress from it’s underlying server implementation, so only the future will tell what happens.
Editor Areas
Enough jarbling around! The editor has three main areas currently. The header, sidebar, and content area. Each of these plays an important part to shaping our editing experience. Out of the box it is pretty straightforward to just start typing content into the editor like you normally would.
Header
The header is the area at the top of the editor.
The editor in the picture above is set into the Top Toolbar mode, meaning that we see the block controls in the top toolbar as opposed to hovering over each block, in a more Google Docs, Microsoft Word fashion. Remember Word in many ways was the killer app of computers for many decades.
Left side of header
The first tool we see in the header is the block inserter. The block inserter is very important, as that is the main way we add new blocks. There are keyboard shortcuts available, but if you are a more visual, the plus button will be your most widely used button.
Next to that we have redo and undo controls. The undo and redo feature keyboard shortcuts as well, but they can be visually accessed here in the header. From my experience, the undo and redo functionality is pretty darn good in Gutenberg. This is partially due to the tech choices made for the project, as well as the great team behind it.
The next two parts of the header are really interesting.
Content Structure
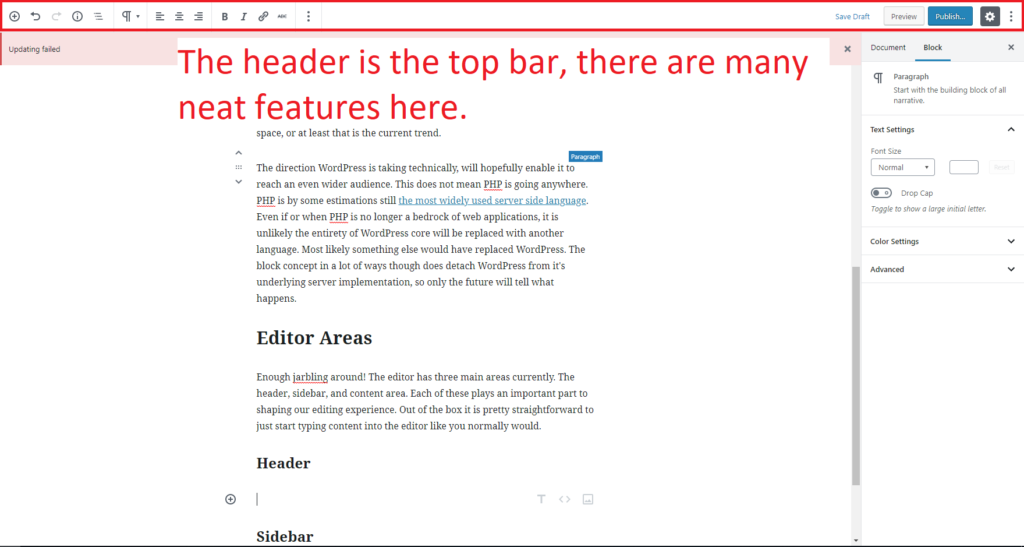
One of the coolest features is the content structure menu, where we get a quick overview of our document.
This current document at time of inserting this image.
I love this feature. I can see how many words I have typed, headings used, paragraphs used and how many blocks. We also get a nifty document outline. Remember we now have a data model of our content, things like this are more at hand and easy to implement. I see very quickly that there is an error in my heading structure, which I have just now fixed. Would I have noticed that in the classic editor? I highly doubt I would have. It’s all about the blocks.
Next on the list is the block navigation.
Block Navigation
When we open the block navigation we get a pretty neat menu of all of the current blocks. We can see our currently selected block, and select the focus for another block in the menu, or just get an overview of the blocks.
We get child block views available as well scoped to this particular block.
On first glance the menu seems very humble, straightforward, and helpful. The reality is that as the future of WordPress evolves, this block navigation will most likely evolve into a central way of interacting within WordPress.
There is an entire scheduled post on this.
That wraps up the left part of the header. The left part of the header is more content focused. The section to the right is more control and document focused.
Right side of Header
We won’t dive into this too much now, but you can save your post, preview it or save a draft from this area. You can close the sidebar as well by clicking on the gear icon. The sidebar is referred to in this case as Settings. Next to that is another hidden gem the “Show more tools & options menu”. We will look in more depth on this in a follow up post.
This area focuses around publishing and settings.
Sidebar
The sidebar, or Settings area of the editor is another cool part. At the top of the sidebar we have tabs: Document and Block. This allows us to separate different controls into different areas within the sidebar. The document controls, are mainly the features we have grown accustomed to in WordPress like: Visibility, Permalink, Categories, Tags, Taxonomies, Featured Image, and excerpt.
Some of the areas that were meta boxes below the post content are now present in this document tab. If you don’t see something you are used to seeing, it has most likely been snuck into the document tab.
As we saw in earlier posts, depending on what block is selected, we will also get contextual controls for each block presented in the sidebar. This is one of the primary areas ripe for exploring extensibility of the editor interface.
Content area
The content area is maybe the most important part, but honestly all three parts synergize together. One is not as complete without the others. We will not be talking about the content area for now. This is mainly to outline it is one of the three key parts to the new editor interface.
Wrapping Up
This should give you a more clear picture of Gutenberg, and outline some of the more hidden gems of the experience. The editor will evolve, but I have a sense that the general UI will be the foundation for years to come. As always, stay tuned for the next post and drop any comments in the comment box.