Learning Docker – A WordPress set up

In my last post about Docker, we saw the basics of setting up images and running containers. Now we are going to build on this with another tool from Docker known as Docker Compose. We will use Docker Compose to set up a WordPress project. If you want to check out the code you can go to the GitHub Repository and play around yourself. WordPress is one of the main technologies I use on a daily basis for work and I thought it would be a good way to dig deeper into Docker.

Docker Compose

Docker Compose is a tool for Docker that let’s you automatically orchestrate containers. In our first foray into docker we manually started and ran each container from the command line. This works great in a small setup or for testing something out, but as soon as you have many containers that all talk to each other and you want a quick way to setup and tear down your project Docker Compose is the way to go. Docker Compose makes use of a docker-compose.yml file to organize the project. Here is our WP setup:

docker-compose.yml

version:                     '3.3'

services:
  db:
    image:                   mariadb:${MARIADB_VERSION:-10.2}
    environment:
      MYSQL_ROOT_PASSWORD:   somewordpress
      MYSQL_DATABASE:        wordpress
      MYSQL_USER:            wordpress
      MYSQL_PASSWORD:        wordpress
    volumes:
      - db_data:/var/lib/mysql
    restart:                 always
    networks:
      - back

  wordpress:
    depends_on:
      - db
    image:                   'wordpress:${WP_VERSION:-5.6.1}-php${PHP_VERSION:-7.4}-apache'
    ports:
      - "8000:80"
    restart:                 always
    hostname:                '${DOCKER_DEV_DOMAIN:-project.test}'
    volumes:
      - ./themes:/var/www/html/wp-content/themes:rw
      - ./plugins:/var/www/html/wp-content/plugins:rw
      - ./mu-plugins:/var/www/html/wp-content/mu-plugins:rw
    networks:
      - front
      - back
    environment:
      VIRTUAL_HOST:          '${DOCKER_DEV_DOMAIN:-project.test}'
      WORDPRESS_DB_HOST:     db:3306
      WORDPRESS_DB_USER:     wordpress
      WORDPRESS_DB_PASSWORD: wordpress
      WORDPRESS_DB_NAME:     wordpress

  proxy:
    image:                   jwilder/nginx-proxy:alpine
    restart:                 always
    ports:
      - '80:80'
    networks:
      front:
        aliases:
          - '${DOCKER_DEV_DOMAIN:-project.test}'
    volumes:
      - '/var/run/docker.sock:/tmp/docker.sock:ro'

networks:
  front:                     {}
  back:                      {}

volumes:
  db_data:                   {}

To spin up the WordPress set up you can run docker in detached mode. You can then navigate to localhost, or project.test (if you added it to your hosts file). You will see a fully operational WordPress setup.

docker-compose up -d

At the very top of the docker-compose.yml we see a version declaration. I am only familiar with Docker Compose 3, but there are more details on the differences on Docker’s website. The next area we see our declaration of services. Each of these services is essentially going to be a Docker container. Within each service we see various properties assigned to each container.

Image

Each container has an image specified here we have 3, mariadb:10.2, wordpress:5.6.1-php7.4-apache, and jwilder/nginx-proxy:alpine. These images all get pulled in from DockerHub, the official repository of Docker images. We have a db container running MariaDB, a wordpress container running WordPress & Apache, and lastly an Nginx server setup as a reverse proxy.

Environment

In our WordPress and DB containers we see an environment property where we are setting up our database. In a production environment you would not want to use these values and instead use real passwords and usernames that are secure. For a local setup, this works just fine.

Networks

We also see a property for each of our containers called networks. These are used by Docker to allow containers to interface with each other. In this example we have two simple networks, front and back. In our docker-compose.yml towards the bottom you will see this code:

networks:
  front:                     {}
  back:                      {}

This sets up the two Docker networks that our containers will communicate on. You can see that the db container only is on the back network and not the front. This is because we want the database to be on a network with other backend services. The wordpress container is on both the front and back network so that it can talk to the database, as well as talk to the Nginx reverse proxy. Lastly we see the Nginx proxy runs on the front with an alias set to whatever our domain for the project will be, making it so that this network is accessible by that domain name. By default this is set to project.test, as long as your hosts file points to localhost, you will be able to use that domain to access WordPress. Pretty neat.

Depends On

We have the wordpress container setup to depend on the db container. This means that the WordPress setup will not fully run until we have set up and have a running db container. This makes sense as WordPress cannot work without the SQL db backing it. depends_on allows us to have complex orchestration of containers and as more services get added there may be more dependencies that are needed.

Restart

If a container crashes, what should happen. This is the goal of the restart property which tells Docker what to do when a given container crashes. In this case all three containers are set to always restart.

Volumes

The volumes property is one of the most important. We will look at two different types of mounts. First we bind our local file system to the wordpress container filesystem for the themes, plugins, and mu-plugins directories:

volumes:
      - ./themes:/var/www/html/wp-content/themes:rw
      - ./plugins:/var/www/html/wp-content/plugins:rw
      - ./mu-plugins:/var/www/html/wp-content/mu-plugins:rw

The first part of volume binding is where we want to locally bind the folder, here it is the current directory themes folder. The next part of the binding is the folder on the actual container’s filesystem. In this case WordPress is installed at /var/www/html, making the themes folder available at /var/www/html/wp-content/themes. The last part of the binding is what type of settings are set for this binding. In this case each of the volumes for the wordpress container are set to Read Write. Allowing us to read and write to the files on our host machine’s filesystem.

Another type of volume we see is just a regular volume mount. Volumes are what Docker uses to persist data. In this case we are using a volume for our database, so that when we stop our containers and restart them the WordPress database will be what it was. Volumes unlike bind mounts are easier to share between containers and are great when you do not need to locally edit the files but still need persistence. Let’s look at two parts of our docker-compose.yml to see how to specify a volume.

volumes:
      - db_data:/var/lib/mysql

volumes:
  db_data:                   {}

The first property is a property on the db container. It is a volume named db_data being bound to the /var/lib/mysql folder on the db container’s filesystem. This is where MariaDB stores the database so we are essentially creating a volume to store all of our db data for the project.

The second volumes property is at the top level of the file and is simply declaring that there is a volume and its name is db_data the {} signifies we are just using the default properties for the volume.

Wrapping Up

I really like how quickly you can set up projects with Docker and how each part of the project can be quickly spun up and down without ever having to install anything on the host machine. If you want to run some PHP code you could spin up a Docker container with an image of PHP installed allowing you to run the code. Then when you are done simply stop and remove the container and nothing was installed directly to the host machine. With Docker Compose you can set up complex projects with different services set inside of containers that can all communicate with one another. Managing this locally can be cumbersome. Managing this with Docker Compose is a breeze. Next I am going to be digging deeper into Docker, and how to use it for actual production deployments instead of just as a local development tool.
Learning Docker – Starting with the basics

Docker is a tool I have been looking to incorporate into my development process for sometime. I have used it many times glossing over the basics and hacking my way through it, but I have not dug in to the finer details of how to operate docker until now. This guide assumes you already have Docker installed.

What is Docker?

Docker is an open-source project for automating the deployment of applications as portable, self-sufficient containers that can run on the cloud, on-premises, or locally. Docker is also a company that promotes and evolves this technology.

Docker allows you to run code inside a container that communicates directly with the host operating system through the Docker engine. Containers are like a computer with an image that is ready to run. The image is like a ready to go hard drive for a container. One of the biggest appeals of Docker is that it allows you to create and run consistent environments, meaning you will not run into situations where code works on someone’s machine but not yours.

Getting started with the basics

Docker is a big topic. We will be exploring it piece by piece and hopefully by the end a clearer understanding of what Docker is, and how to use it will emerge.

Dockerfile

Dockerfile is used to build a Docker image. It is a basic file that contains sequential instructions on how to build an image. The name must be capitalized for it to work. Let’s create a project directory with a Dockerfile in it with the following code:

FROM ubuntu

MAINTAINER edwin

RUN apt-get update

CMD ["echo", "Welcome to Docker"]

Now let’s breakdown each line.

FROM

Generally you use an official image on which you build a new Docker image. In this case ubuntu is our base image, which is called the parent image. You can find images hosted here on Docker Hub. If we want to create a base image, we use ‘FROM scratch’ in the Dockerfile. Any other instructions mentioned in the Dockerfile are going to modify the Docker image.

MAINTAINER

Who the maintainer of the image is.

ENV

ENV is a way to create key value pairs. There are two syntaxes one being a one liner.

ENV APP nginx
ENV PORT 80

The above is equivalent to the following:

ENV APP=nginx PORT=80

Then those values can be used in the rest of the Dockerfile.

RUN

RUN apt-get update

This line runs code on the shell and allows us to modify the docker image. Multiline instructions can be built using the \ character.

RUN apt-get update && apt-get install –y \
package1 \
package2 \
package3

CMD

The CMD directive defines what will be executed when a container is created using the Docker image. We should define only one CMD in a Dockerfile, however if we define multiple CMD instructions in a Dockerfile, only last CMD will get executed. If we specify any command while running the container, the specified command will take precedence and CMD instruction will not get executed. In this case it is a simple echo using the following message provided in the args.

Building the image

Now that we have gone over the basics of our example Dockerfile, let’s build the Docker image using above sample Dockerfile using below command:

docker build -t my_image .

This will build the image named my_image at our current working directory . where the Dockerfile should reside. You will see a whole bunch of output in your terminal, following the pulling of the base image, you will see the RUN command run and finally some more output around building the image. The -t flag is what allows us to tag this image with a name my_image.

Running the image on a container

Now we will run the image on a container. Remember the container is like a computer, and the image is like a special hard drive ready to go. We can run a container with the following command.

docker run --name mycontainer my_image

We should see the output Welcome to Docker on our terminal. Meaning the container started and ran our CMD. This is kind of like a Hello World example of Docker. We will explore more together in future posts!

Wrapping up

Docker uses containers to run images of predefined files, libraries, and code. Images can be built using a Dockerfile which is essentially a list of instructions for how to modify the image. Images can be built on top of parent images allowing ease of extension. Containers are like a computer that runs within the Docker engine to communicate with our host operating system.

JavaScript Fundamentals – Part 3 / Fun with functions

One of the most powerful parts of JavaScript is the function. Functions serve as a way of breaking programs into smaller repeatable parts. Functions have three parts themselves: name, arguments, and body. There are two phases of working with functions, declaration and call.

Function fundamentals

Let’s look at a function declaration.

// Name: addOne
// Arguments: number
function addOne( number ) {
  // Body: return number + 1;
  return number + 1;
}

We named the function addOne, because in the body we are taking our argument number, and returning the value of it plus one. After a function is declared we can call it like so:

function addOne( number ) {
  return number + 1;
}

// Outputs 3 to the console.
console.log( addOne( 2 ) );

When we call a function, we supply the needed arguments, and the body of the function is evaluated, and run. The body is like a mini program inside of our program we can also use functions previously declared inside of other functions.

function addOne( number ) {
  return number + 1;
}

function three() {
  return addOne(2);
}

// Outputs 3 to the console.
console.log( three() );

We declared two functions above, addOne and three. Three pulls in addOne from the upper scope and calls it passing in a 2. We get 3 as the return value. This ability to use functions we declare inside of other functions is very powerful as it allows us to build programs out of small repeatable patterns.

JavaScript allows us to create functions without names, which can be useful for a number of reasons.

Anonymous functions

Anonymous functions are useful when your particular function you create does not need to be used across your program in multiple parts, they serve as sort of “one use” mini programs. An anonymous function might look like this:

function( message ) {
  console.log( message );
}

There isn’t very much special about this at first glance it is just a function declaration without a name. There is not even a way to call this function, so what’s so interesting about anonymous functions? Well they are still a declared value like this:

var log = function( message ) {
  console.log( message );
}

// Outputs "Hello!"
log( "Hello!" );

So we can have alternate ways of “naming” functions, it is important to note that the function does not have a name it is just bound to a variable that we named log. This next example is going to be a little weird and might take a bit to understand:

// Outputs "Calling immediately!" tot he console.
( function ( message ) {
  console.log( message );
} ( "Calling immediately!" ) );

This is known as an immediately invoked function expression or IIFE for short. It is definitely a little strange. We wrap the entire thing in a set of parentheses to mark the expression. We declare an anonymous function, and then immediately call it with "Calling immediately!". It is weird, but it is an important aspect of understanding JavaScript. The reason this works is because in JavaScript functions are values.

Functions as values

Values can be passed around and used anywhere an expression can be used in JavaScript, expressions as you remember from part 2 are pieces of code that should evaluate to some value. It can get a bit weird thinking about a function as a value as it is a bit abstract. It is much more easy to thing of values like 1, 2, 3, and “Strings”. Let’s look at some cool things that come from functions as values:

function Tim() {
  console.log( "Hi Tim!" );
}

function Xi() {
  console.log( "Nǐ hǎo" );
}

function Emilie() {
  console.log( "Bonjour Emilie!" );
}

function greet( greetFunction ) {
  greetFunction();
}

// Outputs "Hi Tim!"
greet( Tim );

// Outputs "Xi"
greet( Xi );

// Outputs "Bonjour Emilie!"
greet( Emelie );

We have three greeting functions for three different people. We then create a generic function greet which takes a function as its only argument, and calls whatever the function is. So we create one greet function that can handle and call another function at any point we choose. Pretty neat.

Scope

JavaScript has different types of scoping to it, but at it its core it is mainly a functionally scoped language. What is that exactly? Understanding scope is best achieved through looking at examples:

var myVarInUpperScope = 1;
var myVar = 2;

// Always will output 2 in this scope.
console.log( myVar );

function coolFunction( myVar ) {
  // Will output whatever the argument is that is passed to this function, creating a new scope.
  console.log( myVar );

  // Always returns 1, because there is no other variable named in this scope, so JavaScript looks to the higher scope.
  return myVarInUpperScope;
}

// Outputs 3, returns 1.
coolFunction( 3 );

// myVar is still 3
console.log( myVar );

// Outputs 1, and returns 1.
coolFunction( myVarInUpperScope );

We can also declare new variables inside a function that will only be accessible to that scope, or other scopes within that function let’s look at a more complex example:

var upperScope = 'Upper';

// Always will output 'Upper' in this scope, unless reassigned later.
console.log( upperScope );

function changeUpperScope() {
  // Grabs the upperScope variable and changes its value.
  upperScope = 'Reassigned!';
}

function defineNewUpperScope() {
  // Make a new variable declaration inside this function scope.
  var upperScope = 'Function';
  var functionScope = 'FunctionScope';

  return upperScope;
}

// Outputs 'Upper', since that is the currently declared value.
console.log( upperScope );

// Returns 'Function', from within the functions scope.
defineNewUpperScope();

// Even though upperScope was defined inside the previous function it
// does not affect the variable at the global scope.
// Still outputs 'Upper'
console.log( upperScope );

// Now the global scope will get reassigned from within a function.
// It grabs the reference from the upperscope and reassigns it.
// Make note of how changeUpperScope does not use a var declaration.
// Instead it uses the same reference as the upperscope, watch what
// happens.

// Call our reassigning function.
changeUpperScope();

// Outputs 'Reassigned!'
console.log( upperScope );

Scope can be complicated in JavaScript, so experimenting with it and really getting a strong grasp on it is critical to understanding JavaScript. We will see how powerful functional scoping can be as well as how catastrophic it can be if not used properly. A common scope problem that can arise is a collision.

Avoiding collisions

JavaScript is a dynamically typed language. This is a fancy way of saying that any value or reference can essentially be overwritten at any point. Any variable, or object we find, can be rewritten on the fly and be something completely different. This crazyness is what often turns people away from using dynamic languages, on highly critical applications, because it is much easier to introduce bugs into dynamic programs. Let’s look at a very common example; collisions. In JavaScript you end up using a lot of other people’s code. Here is Dinesh’s write function.

function write() {
  document.write( 'I am Dinesh' );
}

write();

Here is Arjana’s write function.

function write() {
  document.write( 'I am Arjana' );
}

write();

Both functions are written into the global scope, so if we loaded both of them at the same time in our project, the later loading function would override the other and become the actual function. Resulting that " I am Arjana" is written twice. We can avoid collisions by leveraging IIFE’s like we saw before. Here are what Dinesh’s and Arjana’s files should look like to prevent collisions.

// Dinesh
( function () {
  function write() {
    document.write( 'I am Dinesh' );
  }

  write();
} () );

// Arjana
( function () {
  function write() {
    document.write( 'I am Arjana' );
  }

  write();
} () );

In this case both write functions will now work, because they are independently scoped first. We create an anonymous function, which creates a new function scope, and place the code we want to run inside of it. We then call the function with (), and wrap the entire expression in another set of parentheses. This immediately calls the function we created, and executes the code inside the body of the function with it’s own scope.

We will look at collisions and dependencies in the future more, this is a rough example that probably does not illustrate the issue the best. This technique is known as using a function closure.

Closures

Closures are a special way to use functions to “close over” values and references into a particular scope. Let’s look at an interesting example:

function myClosure ( start ) {
  return {
    next: function() {
      return start++;
    }
  }
}

const counter = myClosure( 1 );

// Returns 1
counter.next();

// Returns 2
counter.next();

// Returns 3
counter.next();

const newCounter = myClosure( 10 );

// Returns 10
newCounter.next();

// Now for something a little weirder.

const newerCounter = myClosure( counter.next() + newCoutner.next() );

// Returns 15
const newerCounter.next();

// Returns undefined, start only exists inside the closure.
console.log( start );

In the future we will see how the above example is actually quite useful. Let’s look at myClosure and what exactly is going on. It is a function that takes an argument start. It returns an object, with a property next. Next’s value is an anonymous function, that returns the post increment value of start; meaning, we get the current value and then the number is incremented by one.

Inside of the next function the start variable is being grabbed from the upperscope of myClosure. Once we call myClosure with a number, we can no longer access what number was passed in, we can only interact with that number by using next; a very powerful property known as encapsulation. Encapsulation means that certain data can no longer be accessed from the outer scope, we “close over” those values. They can still be interacted with from the outer scope, but they do not exist in the outer scope. It definitely takes a bit to fully understand so don’t worry if it does not sink in immediately. We will look more in depth at this example coming up soon, and the different capabilities this provides.

Wrap Up

Functions serve as a powerful tool in JavaScript to allow us to build complex programs out of small reusable parts. We will be checking out some more advanced function features in JavaScript coming up next. If this did not fully set in, take time to reread and experiment on your own, if you get stuck leave something in the comments section.

JavaScript Fundamentals – Part 2

We will be focusing on JavaScript syntax, or the way JavaScript is written, in this section. If some of these concepts are not super clear, try starting with the first article in this series.

Syntax

The art of programming is more like a conversation with a computer than writing. Like any conversation, if you want it to go well, you need to communicate well and in a way that is understood between both parties. Syntax is the set of rules that govern how a language will be interpreted by a computer. We need to follow the syntax of JavaScript in order to be able to use JavaScript to get the computer to do what we want.

In our conversation with the computer there are three basic parts: statements, declarations and expressions. The lines do get a bit blurry so don’t worry about the distinctions too much.

Expressions

Expressions produce values and can be written wherever a value is expected. Here are some basic expressions:

1 + 2;

( 1 + 2 ) * 3;

"String";

[ 1, 2, 3 ];

[ 1, 2, 3 ][0];

{ name: 'Taco' };

function () { console.log(10); };

Each expression can be evaluated for its value.

1 + 2;
// Evaluates to 3

( 1 + 2 ) * 3;
// The ( 1 + 2 ) evaluates to 3, and then we get 9.

"String";
// Evaluates to "String"

[ 1, 2, 3 ];
// Evaluates to the array with [ 1, 2, 3 ]

[ 1, 2, 3 ][0];
// Evaluates to 1

{ name: 'Taco' };
// Evaluates to { name: 'Taco' }

function () { console.log(10); };
// Evaluates to fn () { console.log(10); }

Each of these expressions evaluates to a value in JavaScript. If you need to brush up on values checkout JavaScript Fundamentals Part 1. Arrays and objects are expressions in JavaScript that evaluate to themselves. The trickiest part here is probably the last one the function expression. Here we are creating a function that console.logs 10. In JavaScript functions are also values, known as first class functions. So in this use of a function it is an expression because it is just another value. We will look at this in more depth in the future, but it is important to take a mental note that functions are values in JavaScript.

Most of what you will work with in JavaScript are expressions. Statements in JavaScript serve the purpose of being more fundamental building blocks that do things.

Statements

Expressions only get us so far in JavaScript, statements are things that cause things to happen, but do not return or evaluate to any values. Let’s look at the if statement. if has special meaning in JavaScript, and an if statement is written like this:

if ( true ) {
  "This code is executed.";
}

if ( false ) {
  "This code is never executed.";
}

"this code is executed";

if ( false ) {
  "This code is never executed.";
} else {
  "This code is executed.";
}

As we see above the if statements direct which code is executed and which is not. Inside of the () parentheses we have an expression that must evaluate to either true or false. If that expression is true we run the code inside of the {} curly braces.

Another very common statement in JavaScript is the for loop statement, which allows us to run a section of code multiple times.

for ( var index = 0; index < 100; index++ ) {
  console.log( index + 1 );
}

We have a couple parts to the for statement. Inside the () parentheses we have three expressions, one declares starting variables, the next is the condition for the loop, if true, then we execute the code, after the code runs we run the third expression. When we run this code it will log to our console 1, 2, 3, 4 … 100. So instead of writing out each of those we use the for loop to run the same code over and over. If the for loop doesn’t make much sense don’t worry about it, we will look at it more in depth in the future.

The main takeaway with statements is that they do not evaluate to value, and instead are code we right to affect how our code executes. There are other types of statements in JavaScript, but these are two very important ones.

Declarations

In the for loop above we see var index = 0;, this is a variable declaration. Declarations are parts of our code that create references. References allow us to name a value and reference it later in time. These references and their associated value are stored in the computer’s memory. Let’s look at some basic declarations in JavaScript:

// Variable Declarations.
var ten = 10;
let six = 6;
const seven = 7;

// Function Declaration.
function myFunction() { console.log( ten ); }

The variable declarations above use the assignment operator, =, to assign a variable a value. Above we have the variable ten, and its value is 10. six is 6, seven is 7. We also have a function declaration so now there is a reference myFunction which contains the value fn() { console.log( ten ) }.

References are super useful let’s look at how they are useful in our programs.

var number = 11;

number;
// Outputs 11

number * 2;
// Outputs 22

number;
// Outputs 11

number = 12;

number;
// Outputs 12

number = number * 2;

number;
// Outputs 24

var number = 3;
number;
// Outputs 3

We can see above that we can use the reference number to do all sorts of stuff, and at the end we use the var declaration to redeclare the variable again. By naming these variables we can write code that is more understandable. The above could also be written like this.

var number = ( 11, 12, 12 * 2, 3 );

Not as easy to read, or know what the values are, or even know what is going on. Even though it is more concise we lose a lot of what happened above.

Each declaration however only applies to the scope we are currently executing in.

Scope

Scope can be very confusing in JavaScript, and when you are first starting out it can lead to unexpected results. JavaScript scopes based off of functions, and in some cases block scope. The more important scope to understand is function scope. If we are not inside a function, then our scope is at the global level. Let’s look at how scope impacts our references and declarations.

var number = 10;

function getAScopedNumber () {
  var number = 1;
  return number;
}

function getNumber () {
  return number;
}

function changeGlobalNumber () {
  number = 3;
  return number;
}

getNumber();
// Evaluates to 10

getAScopedNumber();
// Evaluates to 1

changeGlobalNumber();
// Evaluates to 3

getNumber();
// Evaluates to 3

getAScopedNumber();
// Evaluates to 1

There are a couple of things going on here. We declare a variable number in the global scope and give it the value 10. We create a function getAScopedNumber that declares a variable number and gives it the value 1. When we call getAScopedNumber(), we will always get 1 returned for number because we are declaring a variable number in that scope. We have getNumber, which returns the reference to number. Since there is no reference declared in this function’s scope, JavaScript looks for an upper scope and finds the number we declared in the global scope, in this case it is ten if we call that function.

We have a third function changeGlobalNumber, which assigns number the value 3, because we are not using a declaration like var, const, or let this is telling JavaScript we are looking for the reference number, and because we have not declared one in this function scope, it grabs the one from the upper scope, so now our global value for number is 3. You can see this by calling getNumber() again. Functional scoping is confusing, but also very powerful. It might take a while to get the hang of how variables and scope work in JavaScript, and there are some things to look out for that we will cover in the future. For now, you actually have a great understanding of the fundamentals of writing JavaScript.

Putting it all together

var luckyNumber = 7;

for ( var index = 0; index < 10; i++ ) {
  if ( index === 7 ) {
    changeNumber();
  }

  console.log( luckyNumber );
}

function changeNumber () {
  luckyNumber = 13;
}

luckyNumber;
// Evaluates to 13.

This will output the following to the console:

7
7
7
7
7
7
7
13
13
13

Mastering these fundamentals will greatly strengthen your skills when you need to use JavaScript to do something more practical.

Up next

Up next we will be looking at cool things we can do with functions in JavaScript, as they are a fundamental aspect of JavaScript.

JavaScript Fundamentals – Part 1

If you are looking to start learning JavaScript from the ground up, try this article about getting started with JavaScript first. JavaScript is a unique and widespread language. At its core the language is built out of primitive values, and objects.

Primitive Values

undefined, null, strings, numbers, functions, arrays, objects and booleans, are the primitive values that make up JavaScript.

undefined & null

One of the mysteries of working with JavaScript is knowing when undefined and null are used. It is also a mystery why two null values exist. For the most part these are used to signify the absence of something. They can have some pretty quirky behavior that we will look at later on.

strings

Strings are a super useful primitive value in JavaScript. Their main role serves to hold values of text, or sequences of characters. They are enclosed within quotes like this:

"I am a string withing double quotes";

'I am another string in single quotes';

To reiterate, strings are used to process and store text within JavaScript. The programs we right are just sequences of characters, mastering strings opens very interesting worlds. You can learn more about the basics of strings, in a more practical fashion.

numbers

There is only one kind of number in JavaScript, and they are double precision floating point numbers. Don’t worry too much about the name, but basically the numbers in JavaScript are not as precise as we are used to when dealing with decimals.

0.2 * 0.1
// Outputs 0.020000000000000004

20 * 1
// Outputs 20

As you can see, floating point numbers can do some pretty crazy unexpected things, especially when dealing with decimals, integers are. If you are going to be creating programs that highly depend on the precision of numbers and arithmetic, JavaScript might not be the right fit. It is however a great language the large majority of applications.

This type of number in JavaScript has a maximum and minimum value:

maximumInteger = 9007199254740991;
minimumInteger = -9007199254740991;

When you start dealing with really big integers in JavaScript that pass out of these bounds, other weird things can happen.

9007199254740991 + 4
// Outputs 9007199254740996

Above we see an extra 1 being added at the end, which is related to the floating point arithmetic being used. So, as a fundamental takeaway, numbers as we are used to are weird in JavaScript, don’t expect them to work the way you expect, always check what is happening. Numbers are actually relatively complicated across most programming languages.

There are other flavors of numbers in JavaScript.

0b11
// Binary number 3 0b starts the number and digits follow. Base 2

0b111
// Outputs 7

Oo11
// Octal number 9 0o starts the number and digits follow. Base 8

0o111
// Outputs 73

0x11
// Hexadecimal number 17. 0x prefix followed by digits. Base 16

0xff
// Outputs 255

There are some cool binary operators that you can use to work with these numbers for lots of interesting things. In my experience, working with binary digits is not necessarily a fundamental, but they are great to know about and keep in mind. Another type of number in JavaScript is an exponential.

1e5 * 2e20
// Outputs 2e+25

The way they are written is a little odd but basically it breaks down like this:

1e5 is the same as:
1 * 10 ^ 5, which is the same as
1 * 10 * 10 * 10 * 10 * 10

Which is just 100,000.

The first part before the e is the base and then we multiply that number by 10 the number of times after the e. So 1e5 is 1 * 10 to the fifth. Numbers like strings, are very critical part of any program, and mastering them helps lead to mastery of JavaScript.

booleans

Booleans are a very useful and basic value. A boolean can only be one of two values true or false. The clear cut nature of booleans makes them easy to work with and allows us to add logical reasoning to our programs.

var jsIsAwesome = true;

if ( jsIsAwesome ) {
  console.log( 'Woo! Learning JavaScript!' );
} else {
  console.log( 'I am sad.' );
}

The above code will log Woo! Learning JavaScript! to our console, because jsIsAwesome is true, if it was false, we would get I am sad..  Booleans and truth values allow us to take different paths in our programs, and in many ways are highly related to binary numbers and the foundation of how computers even work in the first place.

arrays

Arrays are at their core a way to create a list or collection of other JavaScript values. They become really useful for organizing and grouping different parts of our programs, and the data that powers them. You can learn more about working with arrays here. They look like this:

// Array below!
var array = [ 'I', 'Am', 'an', 'array', 1, 2, 3, true, false ];

// You can access the items like this
array[0];
// Outputs 'I'

array[4]
// Outputs 1

There are many more ways to work and interact with arrays, and they are another fundamental part of JavaScript to understand.

Functions

Functions are a huge part of JavaScript. They allow us to create mini programs within our programs, and so much more. Getting started with functions is really important, as they lead to some very advanced concepts in JavaScript. Functions are a key pillar of JavaScript as a language.

Objects

Objects hold a special place in JavaScript, most of the primitive values we have looked at are also special types of objects. Most objects will look something like this in JavaScript:

var myCoolObject = {
  isCool: true
};

// Access looks like this.
myCoolObject.isCool // Outputs true

Like arrays, objects serve as a way to group various things, in this case, we are taking the property isCool and associating a value of true to it. So when we ask whether our object isCool or not, we get the value associated with that property. The main function for objects is to associate names of things with values. This helps us more easily reason about our programs. Working with objects is a fundamental part of JavaScript.

The difference between objects and values

If the primitives are special forms of objects in JavaScript what is the difference? The main difference is that strings, numbers, booleans, undefined, and null, cannot change; immutable. Objects, and arrays on the other hand can change, referred to as mutable. Here is a quick look at the difference.

var ten = 10;
10 + 1; // Outputs 11
ten; // Outputs 10, ten does not change even though we added 1.

var string = 'Hi';
string + ' World!'; // Outputs "Hi World!"
string; // Outputs "Hi" string stays the same.

var array = [ 1, 2, 3 ];
array.push( 1 ); // Adds 1 to the end of the array.
array; // Outputs [ 1, 2, 3, 1 ] the value has changed.

var object = { name: 'Joe' };
object.name = 'Aadhya';
object; // Outputs { name: 'Aadhya' }, the value has changed at our stored reference.

You can see that the immutable values stay the same, even though we did operations with them. The immutable operations just return new values, they do not change the existing value. Understanding how different operations affect our programs is very important in JavaScript, and takes time to master. For now, don’t worry about it too much. I did somewhat lie above, as JavaScript does have some number operators that are mutable.

var ten = 10;
ten++; // Outputs 10
ten; // Outputs 11
++ten; // Outputs 12
ten; // Outputs 12

The increment operators can mutate our references here so in someways numbers can be mutable as well.

Other aspects of JavaScript

JavaScript has a lot of unique characteristics. It is a dynamic scripting language, with elements of functional, and object oriented languages mixed together. As a scripting language, JavaScript can run in all sorts of different places, which is why it is probably the most widely usable language in existence currently. JavaScript also has some meta programming capabilities as well; programming programs that change our programs. Due to the dynamic and meta aspects of JavaScript, a lot of wild things can happen, so enjoy your adventures in JavaScript!

In part 2 we will look at the fundamentals of JavaScript syntax.

JavaScript – Beginning to build a program in the browser: Part 1

JavaScript was created to help improve the interactive parts of the web. It has evolved a lot over time, and is used in all sorts of places. We however, will start where JavaScript started; in the browser. This is where the fun and magic really begins. If any of the parts we cover do not make sense try and find other lessons that maybe expand and elaborate on some of the details. If you aren’t quite ready to just dive in try here. Remember this should be fun!

Set up

We are going to be moving away from just using the console for now. Instead we are going to load in the JavaScript into the browser on our own page. We will need to create two files index.html and myscript.js.

Creating Files

We are going to need a text editor to work with the files. If you are on Windows, you can use Notepad. If you are on MacOS you can use TextEdit, the fundamentals are the same. Alternatively you can download and use Notepad++, which will have some nicer features than the basic notepads. Notepad and Notepad++ are what I started my programming adventure with. If you want to get real fancy or are bold, try out Atom; a more professional grade text editor. For now, Notepad or TextEdit will work just fine!

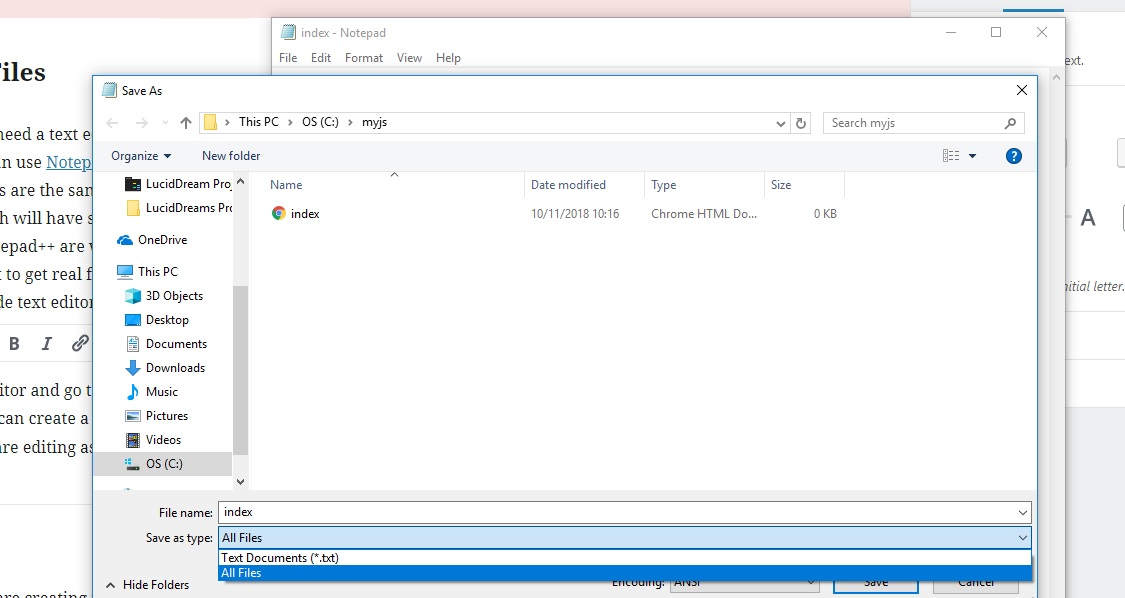
Open up your editor and go to File > Save As. Once you have opened up the save dialog, you can create a folder myjs. Then inside of that folder we will save the file we are editing as index.html. Before saving, make sure to select the All Files for the Save as Type field, your screen might look something like this:

Creating an index.html file

If you accidentally created a .txt file, don’t worry you can always override and eventually get the .html extension. When working with files there is usually a name then a .something, the .something is the file extension; a way of specifying the file type. Now that we have created our HTML file copy paste the following code section into the text editor and save.

index.html

<!DOCTYPE HTML>
<html>
  <head>
    <title>Learning JavaScript!</title>
  </head>
  <body>
    <h1>Learning JavaScript</h1>
    <script src="myscript.js"></script>
  <body>
</html>

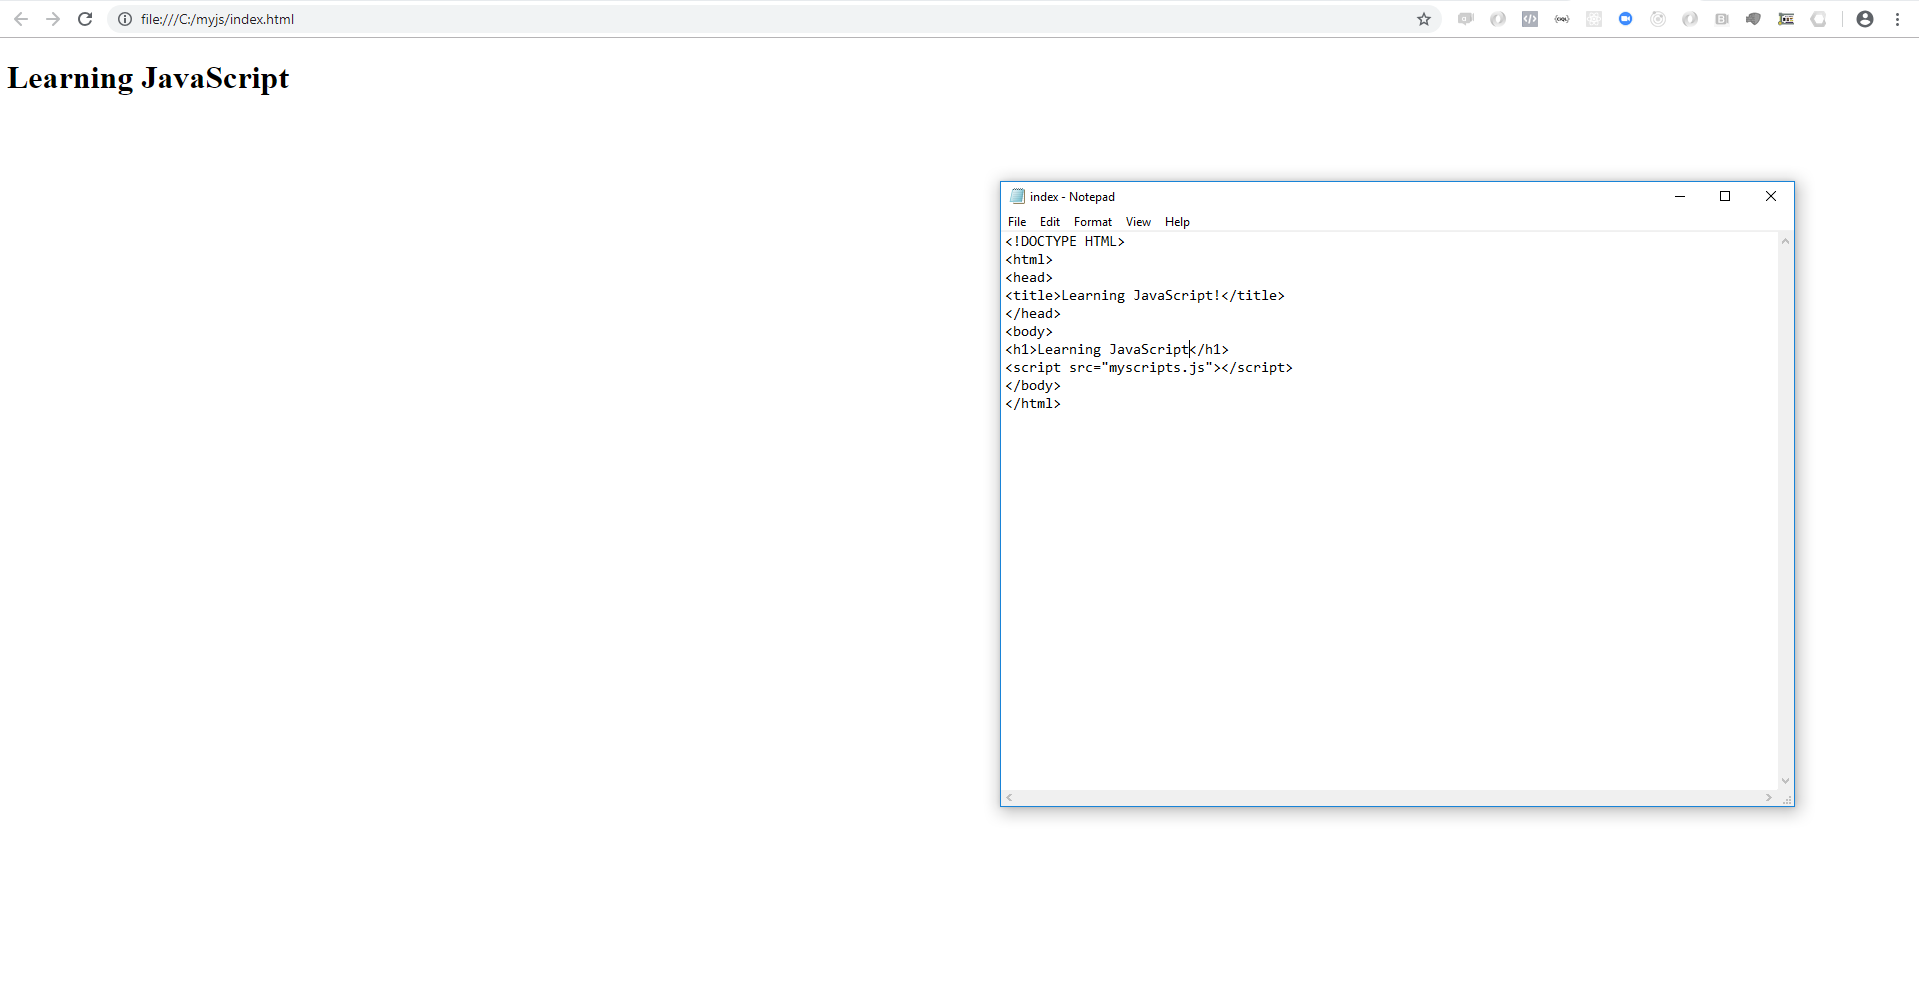
HTML is the structural language for web pages. When the browser opens a website, it reads the HTML and then displays it on the screen in a form we are used to. The <script> tag loads in the myscript.js that we are about to create. Before creating the JavaScript file. Let’s open up the file in our browser. Find the index.html file in your myjs folder, and open it, it should load with your default browser. and should look something like this if you are using Google Chrome.

Our HTML and how it renders in the browser.

If we open up our console we will see an error:

GET file:///C:/myjs/myscript.js net::ERR_FILE_NOT_FOUND

This is basically telling us that the browser could not find the JavaScript file. Well, we haven’t created it yet! Let’s do that now. Use the text editor and go to File > New, then save the file, File > Save As, and this time save the file as myscript.js

myscript.js

Copy, the code below and paste it into the text editor and save myscript.js.

document.write( 'I have created my first JavaScript file!' );

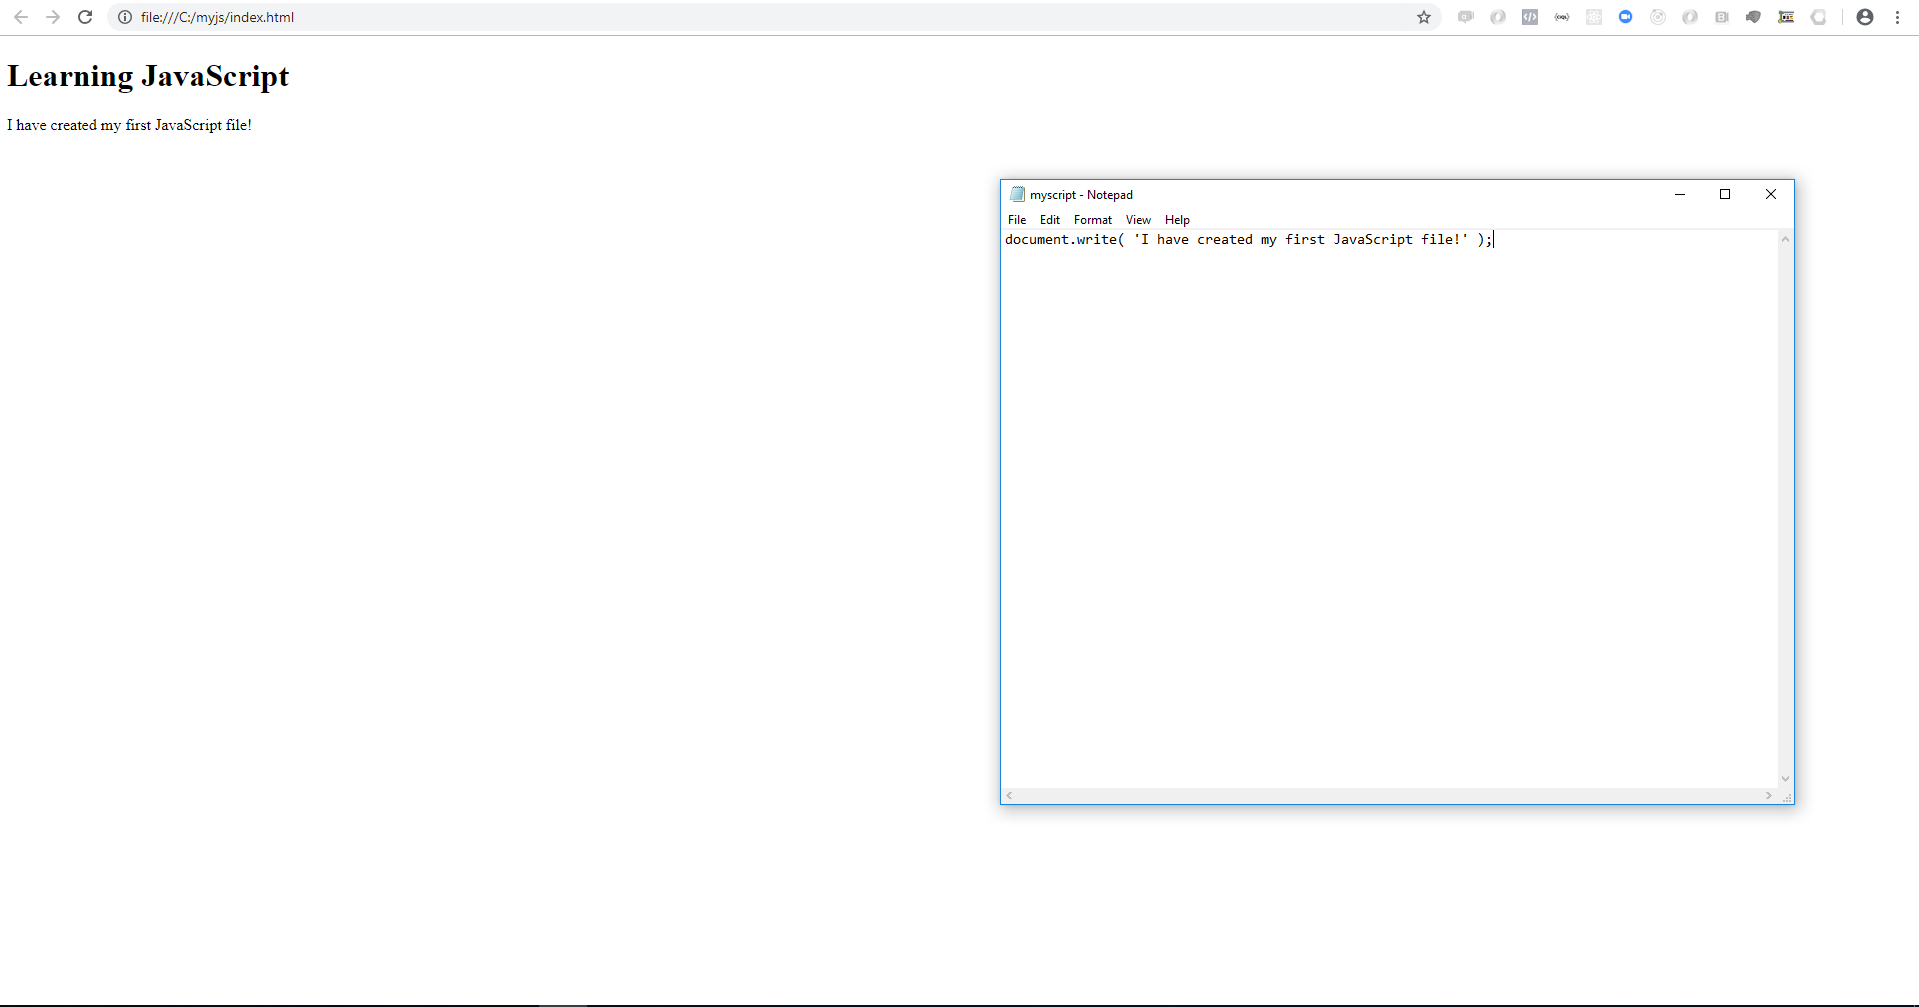
Now that we have saved the myscript.js file we can reload our index.html and it should look something like this:

Loading JavaScript in the browser
Loading our JavaScript file in the browser.

The document.write code adds the extra text to the browser this time, showing that our file has indeed loaded!

Next steps

Getting the basic set up is honestly one of the hardest parts, so great job! In part two we will start getting into some fun stuff!

JavaScript – Beginning to work with functions

Functions are another extremely important part of JavaScript. Most of the work you do will involve working with functions and objects. What is a function? A function is effectively a way to create a mini program within your program. Let’s open up our browser console and dive right in.

// Function declaration below
function getTen() { return 10; }

// Function call below
getTen()
// Outputs 10

The two most important parts of working with functions, are declaring them, and then calling them. Above in our declaration we are making a function getTen that returns the value 10. We can then call getTen by using the parentheses, (), syntax.

When we call a function JavaScript finds that function and then runs the code found in between the curly braces {}. To call any function we use it’s name and tack on () at the end. This can also be achieve like so:

getTen.call()
// Outputs 10

The getTen() syntax is used for brevity, so .call is not used everywhere. Let’s look at some built in functions in JavaScript. In our browser console we can run:

document.write('I am learning functions!')

When this runs there is an undefined output in our console, but “I am learning functions!” is printed onto our browser screen! So what is happening here is we are grabbing the document object in our browser, and getting the write function attached to it. Inside our calling parentheses we have a string 'I am learning functions!'. This string would be known as a function argument, we pass this argument to our function, and it does stuff with that. Let’s look more in depth at working with arguments, it can get tricky.

Function arguments

Enter the following into the console:

// Declare our function getThing
function getThing( thing ) { return thing; }

// Call our function with 20
getThing( 20 );
// Outputs 20

getThing( 'Hello!' )
// Outputs "Hello!"

Experiment calling getThing with other values you can think of. Lets breakdown the declaration. We name our function; getThing. Then we add an argument thing; ( thing ) and finally we have the code that runs when we execute our function; { return thing; }. These three parts can be respectively referred to as the name, arguments, and body. The argument thing is whatever gets passed into the function when we call it. In the body of the function we return whatever thing is.

Multiple arguments

We can create functions that have multiple arguments as well, let’s create a simple addition function.

function add( number1, number2 ) { return number1 + number2; }

add( 10, 1 )
// Outputs 11

add( 33, 55 )
// Outputs 88

To create multiple arguments we name them differently and separate each by a comma within the parentheses. You can effectively have as many arguments as you want. Inside the function body you can then access each argument by matching the names. Functions at this point, probably seem somewhat useless, however I assure you as we progress further you will see how powerful they are in JavaScript.

Why use functions?

Functions bring a number of benefits. One benefit is that they allow us to name an idea that we execute in code. In the last example we created a function add, which takes two numbers and returns their sum. We could create a function doComplicatedThing() { // Do complicated stuff }. Then every time we needed to do that complicated thing we would simply call doComplicatedThing(). This helps make our code easier to follow and read, and brings other benefits.

Another major benefit of functions is that we can choose when we need to call the function. Try this in your console:

function alertMe() { console.log('Function is alerting you!' ); }

alertMe()
// Logs to the console "Function is alerting you!"

setTimeout( alertMe, 1000 )
// One second delay occurs then we are alerted.

Above we see the timeout delays when alertMe gets called by 1000 milliseconds. setTimeout itself is a function and we pass the function alertMe to it, and set the delay as the second argument. Functions can get pretty confusing, so spending extra time to get a good handle on them is very crucial in learning JavaScript.

Input and output

Another way to think of functions is in terms of input and output. Let’s look at a couple of examples.

// Only has input, but does not return anything as output.
function doNothing( input ) { 'Hi!'; }

// Has both input and output.
function getGreeting( input ) { return 'Hello ' + input + '!'; }

// No input, but has an output.
function getTen() { return 10; }

The return statement we have been using is how we get a function to output a value. If there is not a return statement, by default a function will return undefined. The concept of input and output is key moving forward, and I encourage you to think about how things come into and go out of the various parts of your programs.

Wrapping up functions

Functions are a very important aspect of JavaScript. They have three parts: name, arguments, and body. We must declare a function before we can call it. Once declared we can call it to execute the code we put in the function body. Functions are a way to chop our programs up into smaller mini programs. Input and output play a critical role in functions. This is just the tip of the iceberg with functions, there are a lot more really interesting things that can be done with them.

JavaScript – Beginning to work with objects

Objects are an extremely important piece of JavaScript. In fact, everything in JavaScript is an object. Arrays, strings, numbers, are all special types of objects. Objects at their core are just a collection of names and value pairs. Like all of the other data types, there is a lot more to objects, but for now we will focus on the fundamentals. Here is an object representing my name:

{ firstName: 'Edwin', lastName: 'Cromley' }

// The syntax for objects is more commonly written like this.
{
  firstName: 'Edwin',
  lastName: 'Cromley'
}

We have two entries in our object. The first pair has a key firstName and a value 'Edwin', which basically means that the first name for this object is Edwin. Likewise, the key lastName pairs with the value 'Cromley'. Let’s open up the console, and start working with them.

Working with objects

This is a basic object and we can work with them like this:

let myName = { firstName: 'Edwin', lastName: 'Cromley' }

myName.firstName
// Outputs "Edwin"

myName.lastName
// Outputs "Cromley"

We can also create a more detailed object:

let bankAccount = {
  bank: 'Super Awesome Bank',
  routingNumber: 5555555555,
  transactions: [
    {
      type: 'deposit',
      amount: {
        value: 100,
        denomination: 'USD'
      }
    },
    {
      type: 'withdrawal',
      amount: {
        value: 50,
        denomination: 'USD'
      }
    }
  ]
}

bankAccount.bank
// Outputs "Super Awesome Bank"

bankAccount.routingNumber
// Outputs 5555555555

bankAccount.transactions[0].type
// Outputs "deposit"

bankAccount.transactions[1].amount['value']
// Outputs 50

Any of the keys in the object can have any value, here we see a string value for bank, a number for the routingNumber, and an array of objects for transactions. Keys themselves have some restrictions, they can only be a string. Values can be anything though. Because the keys are strings we can also look up the values of objects like this.

let food = { taco: 'delicious' }

food['taco']
// Outputs "delicious"

food.taco
// Outputs "delicious"

So there are two different ways to get a value out of an object, we can use the “array syntax” or use the dot notation. The dot notation is probably the most common, but the array notation in most cases can be much more flexible. We’ll see further on how useful the [] syntax can be used for a lot of different things.

Wrapping up objects

Objects at their core are just a collection of pairs of keys and values. The key is a name where we can lookup the stored value. This allows us to associate names with values. When we get into actual programming situations, we will see how useful this ability to name becomes, as it will allow us to create more understandable code. Objects are very powerful, and are one of the foundational aspects of JavaScript. Remember, almost everything 
in JavaScript is an object.

JavaScript – Beginning to work with arrays

Arrays are a data type that contain values. We can imagine an array of numbers like this:

[ 1, 2, 3, 4, 5, 6, 7, 8, 9, 10 ]

Or we could have a list of fruits:

[ 'banana', 'strawberry', 'blueberry', 'grape' ]

An array contains other data types within itself. Each item can be referred to as an element. Let’s get the console open and start messing around with arrays.

Working with arrays

Arrays can contain any type of data within, for instance you could do something like this:

[ undefined, 'string', true, 3, [ 'array', 'inside', 'array' ], 10 ]

So as we see in the above example we have an array containing a bunch of different elements. One of the elements is even an array itself. The array syntax starts with an opening square bracket, [, followed by each item with a comma to separate. To close out the array we end with a closing square bracket, ]. To lookup the value at a certain position in an array we can use the lookup syntax.

[ undefined, 'string', true, 3, [ 'array', 'inside', 'array' ], 10 ][0]
// Outputs undefined

[ undefined, 'string', true, 3, [ 'array', 'inside', 'array' ], 10 ][1]
// Outputs 'string'

[ undefined, 'string', true, 3, [ 'array', 'inside', 'array' ], 10 ][2]
// Outputs true

[ undefined, 'string', true, 3, [ 'array', 'inside', 'array' ], 10 ][3]
// Outputs 3

[ undefined, 'string', true, 3, [ 'array', 'inside', 'array' ], 10 ][4]
// Outputs [ 'array', 'inside', 'array' ]

[undefined,'string', true, 3, [ 'array', 'inside', 'array' ], 10][4][0]
// Outputs 'array'

[undefined,'string', true, 3, [ 'array', 'inside', 'array' ], 10][4][1]
// Outputs 'inside'

[undefined,'string', true, 3, [ 'array', 'inside', 'array' ], 10][4][2]
// Outputs 'array'

[ undefined, 'string', true, 3, [ 'array', 'inside', 'array' ], 10 ][5]
// Outputs 10

There are a couple of important things to note. The array starts at position 0, more commonly this is referred to as the index; index 0. The first element is at index 0, the second element at index 1. When we get to the array inside of an array, we use a double access array[4] grabs the inner array, then on that value we can grab any element in that so as seen above array[4][0] gives us the first inner element: 'array'.

Finding elements

Another important thing to do with arrays is to find if there is an element in one. If we had an array of numbers, we can find if a particular number exists or not like this:

[ 10, 30, 15, 1 ].indexOf( 1 )
// Outputs 3

[ 10, 30, 15, 1 ].indexOf( 10 )
// Outputs 0

[ 10, 30, 15, 1 ].indexOf( 13 )
// Outputs -1

When we try and search for 13, we get back a value of -1. This

Working with multiple arrays

Sometimes you will have two lists and need to merge them into one list. Here we have two lists of Bruce Willis movies:

[ 'Die Hard', 'Tears of the Sun', 'Sin City' ].concat( ['RED'] )
// Outputs [ 'Die Hard', 'Tears of the Sun', 'Sin City', 'RED' ]

There are definitely a lot more to arrays, but this covers the basics.

Wrapping up arrays

Arrays are a data type that contains a sequence/list of other elements. Each element has an index, and they start at 0 and count up. When you venture further into your JavaScript journey you will see how powerful arrays can be.